How to use a compass
A compass is a navigational instrument that has been used regularly since the 1300s. The main features of a compass are:
Compass rose= Diagram that shows directions, usually includes degrees either from 0-180 or 0-360.
Post= Point on which bearing rest.
Bearing= This is the point in the center of the needle that contacts the post with little friction.
Needle= magnetized metal that points to magnetic North
All Stanley London compass are Magnetic Compasses. A Magnetic compass functions as a pointer to magnetic North. The earth’s magnetic field exerts force on the needle pulling the North pole of the needle towards Earth’s magnetic North pole. The difference between magnetic North and true North, known as magnetic declination, will vary depending on location.
Types of Compasses
Traditional Pocket Compass
Traditional pocket compasses are compasses that have a lid to protect the compass face. Air dampened compasses usually have a needle lift mechanism to protect the bearing during transit. Liquid damped Traditional compass settle on North much faster than an Air dampened version. Examples of traditional compasses that are sold by Stanley London include the Antique, Brushed, or Polished Large; Antique, Brushed, or Polished Medium; Brushed or Polished Miniature; The Matte Silver or Gold, Lightweight Brass or Copper, and Wilderness compasses.
Open Faced Compass
Open faced compasses are similar to traditional compasses except they do not have a lid to protect the compass face. Higher end air dampened models have a needle lift mechanism to protect the bearing during transit. Open faced compass range in size from small necklace pendants up to 3 inches i diameter. Open faced compasses are faster at take a reading than a traditional compass. Examples of poen faced compasses that are sold by Stanley London include the Mariner's, Aviatiors, Sea Scout, Aluminum, Cardinal Points, Thin Bezel, Luminescent Hiking, and Antique or Polished Watch style compasses
Clinometer Compass
A clinometer compass has a clinometer pendulum that is used to measure the incline/decline angle. When the compass is placed on its side and the mirror is placed in the 45 degree position, the angle of the pendulous arm can be read while simultaneously viewing the object. Examples of clinometers that are sold by Stanley London include the Forestry, and Handle Clinometer compasses.
Reverse Compass Rose
A compass with a reversed compass rose functions like a GPS unit. East and West are reversed on the compass rose. When you are sighting directly North, the compass needle will point to North. If you turn 90 degrees to your left, you will be sighting due West, but the compass needle rotated 90 degrees to the right, which reads West on a reversed compass rose. Examples of reverse rose compasses that is sold by Stanley London is the Forestry compass.
Lensatic Compass
Sometimes called a military compass, a lensatic compass feature a front and back sight used to take more precise azimuth readings while sighting objects. Examples of compasses that are sold by Stanley London include the Pocket Surveyor's, Antique Engineering, Antique Military, Zinc, Aluminum, or Mil-Spec Tritium compasses.
Prismatic Compass
A prismatic compass is a lensatic compass with a prism front sight. The prism allows the user to simultaneously view the object being sighted and its magnetic heading. Examples of Prismatic compasses that are sold by Stanley London include the Prismatic Stand and Surveying tripod compasses.
Mil-Spec Calibrated Compasses
A Mil-Spec compass is a compass made to military specifications. A Mil-Spec compass is required to operate in temperature ranging from -40°F to 131°F (-40°C to +55°C) and have an accuracy of +/- 2 mils. The Mil-Spec compass that is sold by Stanley London is the Cammenga compass.
Gimballed Compass
A gimballed compass is a compass that has been attached to a gimbal ring so that when whatever the compass is mounted to is tilted the compass remains level for viewing. This was created to make reading a compass at sea easier. Examples of Gimballed compasses that are sold by Stanley London include the Gimballed Stand, Miniature Box, Inlaid Rose, Glass Lid, Executive Miniature, and Air-Damped Compasses.
General Compass Directions
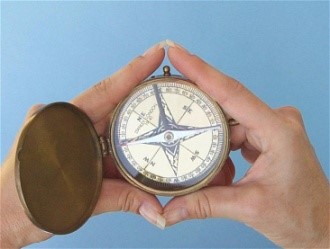
To determine your heading, rotate the compass until the arrow point is exactly over the “N” on the compass rose. Your magnetic heading can be read from the compass rose in the direction you are facing. It is helpful to hold the compass in your fingers as shown, and read the heading where your index fingers meet.
To orient your map to North, lay the map on a flat surface and align the magnetic North line on the map with the arrow on your compass. To find your position using a map, take two azimuth readings on separate objects visible on the terrain and indicated on the map. Then on your oriented map, take the angle readings and draw two rays from each of the points using the same angle readings. Your present location is where the two rays intersect. See below example.

Determining your Position with a Pocket Compass with a Declination Ring
by Eric Newman
If you could ask for a single upgrade to a conventional pocket compass with a compass needle, it would be a movable declination ring. In the tutorial on using a standard pocket compass with a compass needle, we found that taking a bearing was relatively easy, but if our map was only referenced to true north, the correction for readings referenced to magnetic north was cumbersome.
In this tutorial we will use a pocket watch style pocket compass with a movable declination ring, and a magnetized needle suspended over a compass rose marked 0 - 360 degrees, as shown in Figure 1.

Figure 1Click for larger image
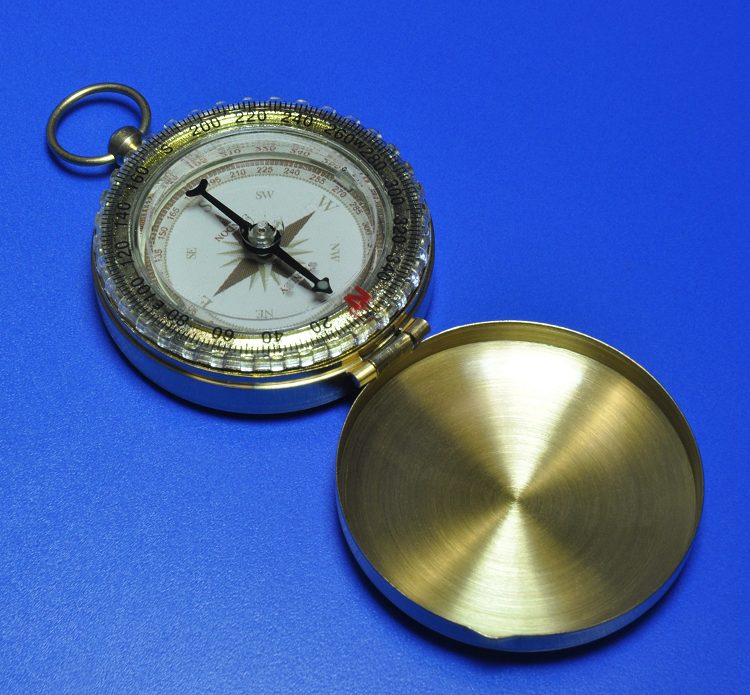
Figure 2Click for larger image
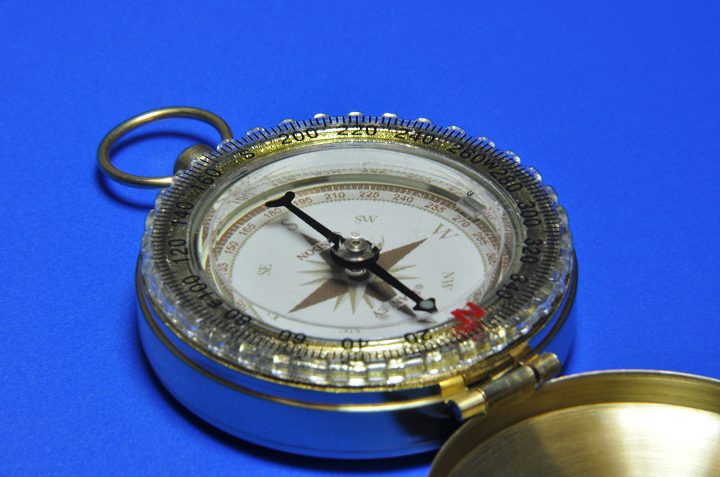
Figure 3Click for larger image

Figure 4Click for larger image
If you do not have a compass rose on your map, then north is up, east to the right is 90 degrees, south is 180, and west is 270 degrees. The problem is that these are probably referenced to true north, and your pocket watch style compass reads magnetic north. The difference between true north and magnetic north is the local magnetic declination, which depends on your general area. The magnetic declination in Los Angeles is 13 degrees east. New York City is 13 degrees west. If you are lucky enough to be lost just west of the Mississippi River on the agonic line where the declination is zero, then magnetic north and true north are the same, so your compass reads true north. If you are not so lucky, you need a method to take compass bearings referenced to true north, even though your compass senses magnetic north. As you have guessed by now, this is where the magnetic declination ring comes in.
You need to determine the declination in your area. If you intend to use the declination rose or lines on your map, check the map's date for the yearly correction as magnetic north wanders over time.
Your new compass should have the declination ring's north exactly aligned to the compass rose north, as shown in Figures 1 - 3. If you are in New York where the declination is 13 degrees west, rotate the declination ring 13 degrees clockwise so that north on the compass rose aligns with -13 degrees (equals 347 degrees) on the declination ring. In the Los Angeles area with 13 degrees east declination, rotate the declination ring 13 degrees counterclockwise. If your map has two concentric compass roses, one true and one magnetic, you see that we are mimicking these two roses on your compass.
An extremely useful feature of good quality compasses with declination rings is to have luminescent dots on the north end of the compass needle, and two that move with the Declination Ring. This is invaluable using your compass in the dark. See Figure 4.
Now you are ready to take headings. Locate two or three landmarks that you can also locate on your map. A landmark can be a water tank, church spire, radio antenna, or a distant hilltop. Ideally, you want two landmarks about 90 degrees apart, or three landmarks about 120 degrees apart. You do not want any two landmarks to be in a nearly identical heading, or 180 degrees apart. It is also critical that you can clearly see the landmarks and locate them on your map.
Now find the magnetic bearing for the first landmark. Face the direction of the landmark and hold your pocket compass just below eye level. Make sure you hold the compass steady and level. Slowly rotate the entire compass until the north end of the compass needle is exactly over the north marking on the compass rose. The north end of the compass needle is usually marked red or has an arrow shape. Align the compass needle to the compass rose, not the declination ring. See Figure 2.
While you are holding the compass with the needle precisely aligned to the compass rose, sight the landmark across the center of the compass bearing and read the degree marking on the compass rose directly away from you. Note this heading because you will need it to find your location on your map. In Figure 3, we are sighting a bearing of 222 degrees, referenced to true north.
Repeat this procedure with the next landmark and note this second angle. For our example, the second landmark is in the direction of 186 degrees. If you can identify a third landmark and determine its magnetic bearing, that is even better.
Now transfer your landmark headings directly onto your map. Lay your map out flat and locate the compass rose or grid lines on the map. Since you have already corrected your headings for true north, use the true north compass rose, or up on the map for true north.
You can either transfer a parallel line between your landmark and the map's compass rose, or you can place your pocket compass directly onto the map and transfer the landmark heading to the map's compass rose by moving the compass. With the compass aligned to the map, you can use its compass rose to draw a line through the first landmark using the angle of the first landmark's bearing. Repeat this with your other landmarks, drawing a line for each in the direction of its direction.
Figure 5Click for larger image
Refer to the topographic map in Figure 4 and note the 222 and 186 degree lines. Where the two lines intersect is your location. If you have three landmarks, consider your position to be in the triangle formed by the three lines. The triangle should be fairly small. If your triangle is large something is wrong. You probably incorrectly identified a landmark, misread the heading, or did not draw the lines correctly. This is a good reason to use three landmarks, as two lines from two landmarks will not show a problem. The more landmarks you use, the more confidence you will have in your position.
Now that you have your location, verify that it is reasonable. Using the example in Figure 4, you should be near a reservoir and near the top of a ridge. The ridge near you should be running roughly east-west and the closest shore of the reservoir should be southwest of you.
Determining your Position with a Dial Pocket Compass and a Map
by Eric Newman
So you've used a standard pocket compass with a compass needle to take a sight and it was a bit of a pain. Now you are wondering if there is an easier way. Yes, a pocket compass with a floating compass dial makes sighting much easier.
To take a bearing you need a protractor, which is a circle divided 0 - 360 degrees, and you have to reference the protractor to north. Luckily, a protractor is actually built into the compass rose. When using a compass with a compass needle, you need to orient the compass rose to north, which you do by rotating the compass rose until the north end of the compass is exactly over north on the compass rose. That is a bit of a pain.

Figure 1Click for larger image

Figure 2Click for larger image
In this tutorial we will use an open face compass with a floating compass dial marked 0 - 360 degrees. See Figure 1. The beauty of a compass with a floating compass dial is that the compass magnets are built into the floating compass dial, so it automatically aligns to north, and you do not have to align it manually.
To locate your position, first locate two or three landmarks that you can also locate on your map. A landmark can be a water tank, church spire, radio antenna, or a distant hilltop. Ideally, you want two landmarks about 90 degrees apart, or three landmarks about 120 degrees apart. You do not want any two landmarks to be in a nearly identical heading, or 180 degrees apart. It is also critical that you can clearly see the landmarks and locate them on your map.
Now find the magnetic bearing for the first landmark. Face the direction of the landmark and hold your floating compass dial pocket compass just below eye level. Make sure you hold the compass steady and level. Sight the landmark across the center of the compass bearing and read the degree marking on the compass dial directly away from you. Note this heading because you will need it to find your location on your map. In Figure 2, we are sighting a bearing of 222 degrees.
Repeat this procedure with the next landmark and note this second angle. For our example, the second landmark is in the direction of 186 degrees. If you can identify a third landmark and determine its magnetic bearing, that is even better.
Now transfer your landmark headings directly onto your map. Lay your map out flat and locate the compass rose on the map. Sometimes there are two concentric compass roses, with one in a slightly different orientation from the other. If this is the case, use the one marked "magnetic."
You can either transfer a parallel line between your landmark and the map's compass rose, or you can place your pocket compass directly onto the map and transfer the landmark heading to the map's compass rose by moving the compass. With the compass aligned to the map, you can use its compass rose to draw a line through the first landmark using the angle of the first landmark's bearing. Repeat this with your other landmarks, drawing a line for each in the direction of its direction.
If you do not have a compass rose on your map, then north is up, east to the right is 90 degrees, south is 180, and west is 270 degrees. The problem is that these are probably referenced to true north, and your pocket watch style compass reads magnetic north. The difference between true north and magnetic north is the local magnetic declination, which depends on your general area. You need to determine the declination in your area. The magnetic declination in Los Angeles is 13 degrees east. New York City is 13 degrees west. If you are lucky enough to be lost just west of the Mississippi River on the agonic line where the declination is zero, then magnetic north and true north are the same, so your compass reads true north. If you are not so lucky, simply adjust your compass readings for your declination. For New York where the declination is 13 degrees west, just subtract 13 degrees to your compass reading to get a heading referenced to true north. In the Los Angeles area with 13 degrees east declination, add 13 degrees to your compass reading. And get a better map.
Figure 3Click for larger image
Refer to the topographic map in Figure 3 and note the 222 and 186 degree lines. Where the two lines intersect is your location. If you have three landmarks, consider your position to be in the triangle formed by the three lines. The triangle should be fairly small. If your triangle is large something is wrong. You probably incorrectly identified a landmark, misread the heading, or did not draw the lines correctly. This is a good reason to use three landmarks, as two lines from two landmarks will not show a problem. The more landmarks you use, the more confidence you will have in your position.
Now that you have your location, verify that it is reasonable. Using the example in Figure 3, you should be near a reservoir and near the top of a ridge. The ridge near you should be running roughly east-west and the closest shore of the reservoir should be southwest of you.
Finding your Position using a Conventional Pocket Compass with a Compass Needle
by Eric Newman
Do you need to have a sighting compass to determine your location with a map? No, a good quality pocket compass will work nicely.
In this tutorial we will use a pocket watch style pocket compass with a magnetized needle suspended over a compass rose marked 0 - 360 degrees. If your compass has a floating compass dial instead of a compass needle, the method is slightly different and easier.

Figure 1Click for larger image

Figure 2Click for larger image
First locate two or three landmarks that you can also locate on your map. A landmark can be a water tank, church spire, radio antenna, or a distant hilltop. Ideally, you want two landmarks about 90 degrees apart, or three landmarks about 120 degrees apart. You do not want any two landmarks to be in a nearly identical heading, or 180 degrees apart. It is also critical that you can clearly see the landmarks and locate them on your map.
Now find the magnetic bearing for the first landmark. To take a bearing you need a protractor, which is a circle divided 0 - 360 degrees. It so happens that this protractor is built into the compass rose. Next you need to orient that protractor or compass rose to north, which you will do with the compass needle.
Face the direction of the landmark and hold your pocket compass just below eye level. Make sure you hold the compass steady and level. Slowly rotate the entire compass until the north end of the compass needle is exactly over the north marking on the compass rose. The north end of the compass needle is usually marked red or has an arrow shape. See Figure 1.
While you are holding the compass with the needle precisely aligned to the compass rose, sight the landmark across the center of the compass bearing and read the degree marking on the compass rose directly away from you. Note this heading because you will need it to find your location on your map. In Figure 2, we are sighting a bearing of 222 degrees.
Repeat this procedure with the next landmark and note this second angle. For our example, the second landmark is in the direction of 186 degrees. If you can identify a third landmark and determine its magnetic bearing, that is even better.
Now transfer your landmark headings directly onto your map. Lay your map out flat and locate the compass rose on the map. Sometimes there are two concentric compass roses, with one in a slightly different orientation from the other. If this is the case, use the one marked "magnetic."
You can either transfer a parallel line between your landmark and the map's compass rose, or you can place your pocket compass directly onto the map and transfer the landmark heading to the map's compass rose by moving the compass. With the compass aligned to the map, you can use its compass rose to draw a line through the first landmark using the angle of the first landmark's bearing. Repeat this with your other landmarks, drawing a line for each in the direction of its direction.
If you do not have a compass rose on your map, then north is up, east to the right is 90 degrees, south is 180, and west is 270 degrees. The problem is that these are probably referenced to true north, and your pocket watch style compass reads magnetic north. The difference between true north and magnetic north is the local magnetic declination, which depends on your general area. You need to determine the declination in your area. The magnetic declination in Los Angeles is 13 degrees east. New York City is 13 degrees west. If you are lucky enough to be lost just west of the Mississippi River on the agonic line where the declination is zero, then magnetic north and true north are the same, so your compass reads true north. If you are not so lucky, simply adjust your compass readings for your declination. For New York where the declination is 13 degrees west, just subtract 13 degrees to your compass reading to get a heading referenced to true north. In the Los Angeles area with 13 degrees east declination, add 13 degrees to your compass reading. And get a better map.

Figure 3Click for larger image
Refer to the topographic map in Figure 3 and note the 222 and 186 degree lines. Where the two lines intersect is your location. If you have three landmarks, consider your position to be in the triangle formed by the three lines. The triangle should be fairly small. If your triangle is large something is wrong. You probably incorrectly identified a landmark, misread the heading, or did not draw the lines correctly. This is a good reason to use three landmarks, as two lines from two landmarks will not show a problem. The more landmarks you use, the more confidence you will have in your position.
Now that you have your location, verify that it is reasonable. Using the example in Figure 3, you should be near a reservoir and near the top of a ridge. The ridge near you should be running roughly east-west and the closest shore of the reservoir should be southwest of you.